Followers

Showing posts with label Wedding. Show all posts

Monday, 11 August 2014

Dream Valley Challenge 88 - Weddings!

Hiya!

We have a lovely new challenge for you over at Dream Valley.....

WEDDINGS!

Now I don't now about you but it seems like everyone is getting married at the moment.... This is the first of three wedding cards I've made just recently and I've still got one to go :-) I love taking the opportunity to personalise a card to make it something the happy couple can keep and treasure....

Sorry the picture is a little blurry - I couldn't get it to focus properly no matter how hard I tried! :-(


Gorgeous little piccie from LOTV - you can't see all the glitter on the flowers etc either - grrrr!


This is better - in focus and glittery - yay! :-) Computer printed personalisation....


And again....!


Please pop over to Dream Valley and add your beautiful wedding creations to our challenge!

Love 'n' hugs,

Sunday, 6 January 2013

Dream Valley Challenge 48 - Anything goes!

Hiya!

Happy New Year!

I hope you all had a lovely restful Christmas with your families and loved ones. I know I did :-)

It's our first challenge of the year over at Dream Valley and our theme is Anything Goes!  I thought I'd start the year with a Wedding card...... New year, new beginning!


The image is from LOTV..... I followed the colour scheme of the day which was silver, black and white.  Unfortunately the silver mirror card is showing up a nasty orangey colour here cos of my harsh kitchen lights :-( But I hope you can still see the sparkle on the veil....


Hope you like!

Love 'n' hugs,


Tuesday, 3 April 2012

A Wedding Piccie for you......

Hiya!

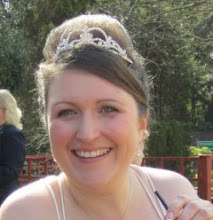
Just a quick stop by to show you all a piccie from our big day :-)


We had a lovely day with gorgeous weather and all our friends and family around us. It couldn't have been more perfect!

And a special thank you to those of you in blogland who sent us some absolutely gorgeous cards! We were really touched. I blubbed like a girl while reading them. Thank you so much!

I'll be back when we've had a little honeymoon time to recover from all the excitement :-)

Love 'n' hugs,
The new Mrs Byron!!!

Sunday, 1 April 2012

Dream Valley Challenge 29 - Wedding/Love

Well, this is it! Today is the day!!! I'm not actually really here..... Really I'm at the hotel having a last minute flap before I get married in about 2 hours time :-) Eeeeeek! :-)

And that is why the lovely girls over at Dream Valley have set our latest challenge to be

Wedding/Love!!!!

Aren't they sweet??? :-)

I thought for this project I'd show you something I've been working on for our big day..... This is our Wishing Well!


For those of you not familiar with the idea, a wishing well can be used as an alternative to wedding presents from your guests. Paul and I have been together for 8 years so we don't have the need for traditional wedding presents like towels and things so to save everyone trying to hunt round for something we might need, instead we invite them to make a wish for us and put it in our wishing well!

This is what it looked like when we first bought it:


We gave it a coat of white paint and I went on a shopping trip with my good pal, Yvonne, to buy some artificial roses and ivy....

There are larger roses at the bottom, across the front....


Leading up to smaller roses and rose buds up the side.....


I filled the bucket with more rose buds and ivy and lined the inside of the well with a pillow case so that our wishes don't fall out the bottom :-)


The poem on the roof.....


I hope you like it! Now wish me luck cos I expect I'll be really nervous right about now :-)

I'll be back when I'm Mrs Byron!!!!

Love 'n' hugs,

Sunday, 8 January 2012

Dream Valley Challenge 23 - Anything goes: My wedding invitations

Hiya!

Well that didn't exactly go to plan, did it? I had (still have....) all these Christmas cards to show you and I haven't had five minutes to myself to add them to my blog, nevermind visit everyone else's!  So here it is, my first blog post of the year so I thought I'd make it a special one.  Not only is this for Dream Valley's first challenge of the year (which is ANYTHING GOES as it happens....) but it is also my opportunity to show you my wedding invitations and my very first tutorial! I hope you're prepared for a lot of photos....

I needed two versions for the wedding and the evening reception.....


The decorative corner is cut from some beautiful pearlescent champagne coloured paper I got from ebay. I'm afraid I can't tell you exactly what the die is cos I borrowed it from a good friend of mine but if anyone really wants to know I'll go back to her and try to find out for you.... You've seen the punched butterflies a million times before on my cards but this is the reason I originally bought the punch!  The wording stamps are from Papermania.

And then when you open it out......


A blogging pal was looking for a template for a tri-fold pocket card and I joined the hunt and became so cross that I couldn't find one that I decided to make my own..... I grew to love the design so much I decided they just had to be the format for my invites.  Now being a bit tight (perhaps that should be thrifty.... or careful....) I've designed these to be cut from one sheet of A4 each as you will see below (if you haven't lost the will to live before you get there!)

I had so much trouble finding some beautiful decorative scrolls and accents to add to my inserts that in the end I approached the lovely Lynne at Sentiments 4 You and she designed this beautiful set just for me - isn't she a sweetie!  I've printed the wording onto the same champagne coloured pearlescent paper I used on the front.


The little pocket contains tags with all the little bits of information my guests need - directions, accommodation information, gift info and the RSVP card in its own little envelope :-) I decorated the pocket with the antique gold pearlescent paper I had used as a matt for the wording and the butterflies on the front. A pain in the bum to do but worth it!


Paul and I have been together for years so we don't need any pressies so instead we're having a wishing well. If you're not familiar with the idea, your guests can throw some pennies into the wishing well instead of buying a present and make a wish for you instead. There are loads of wishing well poems out there but I couldn't find any that said exactly what I wanted to say, so instead I pinched bits from several and made up my own.  You should be able to read it if you click on the piccie and enlarge it....


When you fold it all up it looks like an envelope at the back so I added a little envelope seal to keep it all intact....


So here's the tutorial bit.....

Start with your piece of A4 card in the landscape orientation.

The measurements starting top RIGHT and moving across to the left are 1cm, 10cm, 10.2cm, 4cm.

Repeat those measurements 14cm down the page.

Make the envelope flap by measuring 6cm out from the point halfway down the left-hand vertical line (7cm down)


The pocket is the tricky bit. Continue the two right-hand vertical lines another 6cm down the sheet. Between these lines you need to form the v-shape to make your pocket. I found the easiest way was to locate the centre of the right-hand panel (this is 6cm from the right-hand edge of the card) and measure down 4.5cm.  Add 1cm wide flaps to each side of the pocket as shown and then trim away the excess card.


Score and fold either side of the central panel, the base of the right-hand panel and the flaps on the pocket.....


If you want to decorate the right-hand panel, I would do that now before you stick the pocket in place.

IMPORTANT: Check the folding of your card is straight. The extra 0.2cm on the middle panel allows room for the pocket when folding so it is all aligned. If, when you fold it, it isn't quite square, cut a tiny way into the line between the pocket and the right-hand panel from the left-hand flap and tuck the flap in a little tighter. This seems to rectify most problems.....

Fix the pocket in place....


Check the folding of your card and decorate as you wish!


I hope that all sounds quite straight forward. It wasn't that hard really, once I'd figured out the measurements that worked. If I haven't explained myself very clearly, try enlarging the piccie with the measurements on it or feel free to ask me any questions. And please, if you have a go, let me know so I can pop over and have a nosey :-)

I'm entering this into the Anything Goes challenge over at CES challenges.

Anyway, if you've made it this far I'm impressed! And thank you! Hope I haven't bored you to tears :-)

Now please do remember to pop over to Dream Valley and join in with our ANYTHING GOES challenge and see what all my fab teamies have made and I PROMISE to go visiting all your blogs very soon.

Love 'n' hugs,


Tuesday, 4 October 2011

An exploding box...

Hiya!

Warning - taken millions of piccies of this one so I'll try to keep my words brief!

My step-sister asked me to make an exploding box for her to give to some friends on their wedding day. You can just see one of my handmade scrunchy flowers on the side....


The sentiment on the lid is one of my faves from Sentiments 4 You:


The second box inside.... The butterfly is an xcut punch, the Mr & Mrs stamp is from papermania...


The image is from Pollycraft coloured with promarkers and glitter glue. I won the die cut heart and wedding outfit in candy wins and the glittered vellum in the background is from the Tatty Teddy range...


Another sentiment from Sentiments 4 You, more use of nesties and some beautiful rings from a candy win....


My first go at making a paper wedding cake! Flowers from papermania, ribbon from stash...


Another die cut heart from a candy win.... You can see the faux stitching on the cake from this angle...


Computer generated sentiments and lots of glitter glue!


Phew! That was a long post! Thankyou for sticking it out till the end :-)

Challenges:
Paperplay - White + 1 other colour
The ABC Challenge - A for Anything goes
Simon says stamp - Anything goes
Wags 'n' Whiskers - Handmade (scrunchy flowers, wedding cake)

See you again soon! Thankyou for visiting :-)

Love 'n' hugs,

Wednesday, 21 September 2011

Lili of the Valley wedding card....

Hiya,

I'm on a mission to show you all the cards I've made recently but not managed to post about :-)

This was for my cousin who got married a couple of weeks ago. I love this sweet LOTV image :-)


I've coloured it with my promarkers and added plenty of glitter - of course you can't see any of it here! I'm rubbish with a camera! :-) It's all round the lacy edges of her dress... honest!


I added some flowers and fixed little gems to the centres.


The sentiment is from Sentiments 4 You and I cut it out with my nesties. Unfortunately I'd printed it a little bit too big for the nestie and it cut off a little bit of the "W" so I covered it up with my little punched butterflies :-) I added little gems to the "i's" in the sentiment....

Other things I used:
Papers - Background: Dovecraft, Matts: handmade paper
Ribbon - Candy win
Die cut heart - Candy win
Pearls from stash

Challenges:
Simon Says Stamp - Dies to die for
Paperplay - Punches and dies
Creative inspirations - Let's celebrate
CES challenges - Embellish me more (flowers, butterflies, ribbon, gems and pearls)


I also decorated the inside but I forgot to take a photo of it :-( Too late now cos I've given it away!

Before I go my fab Dream Valley teamie, Lin, is having a design team call over at Crafty Cardmakers..... Please pop by and have a look..... If I wasn't absolutely up to my eyeballs with life I'd definitely be trying my luck there! 

Right, I'd better be off. Busy, busy busy! Back again soon :-)

Love 'n' hugs,